Have you ever wondered why some Strawberry Cream Layer Cake recipes fall flat while others create memorable moments that linger long after the last crumb is gone? The secret lies not just in the ingredients, but in the technique and passion poured into each layer.
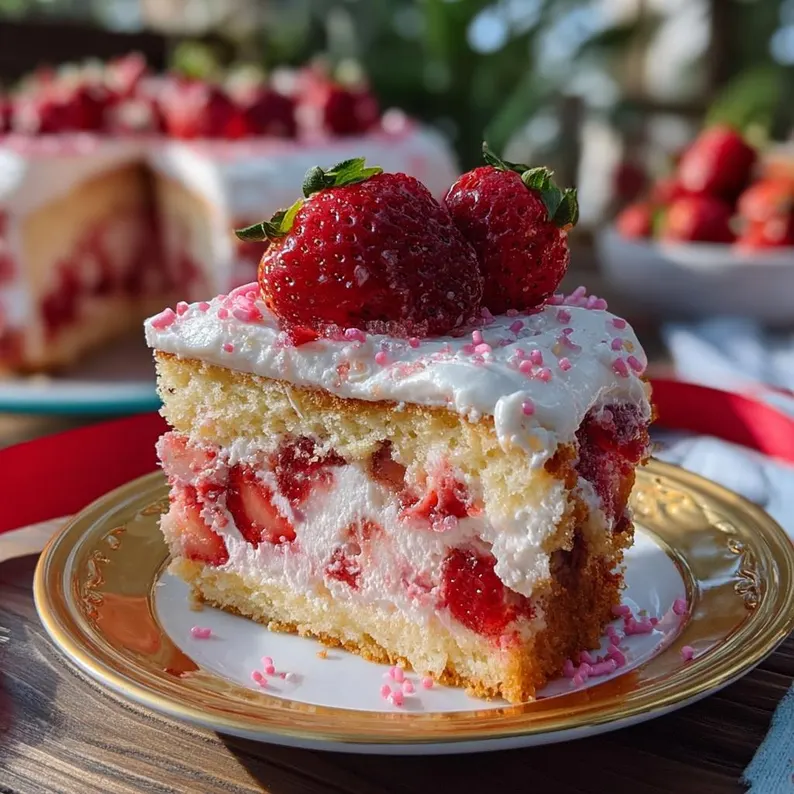
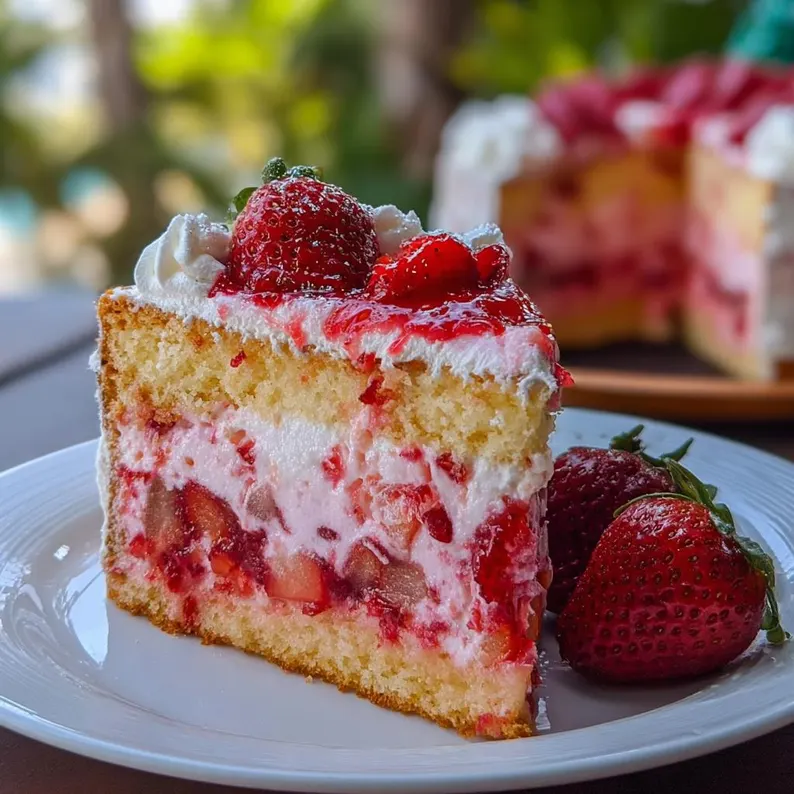
This delightful Strawberry Cream Layer Cake combines the sweetness of ripe strawberries with light, fluffy cake layers and a silky cream frosting that melts in your mouth. Perfect for birthdays, anniversaries, or simply brightening an ordinary day, this recipe strikes the perfect balance between sophisticated flavor and comforting familiarity.
Ingredients List
For the Cake Layers:
- 3 cups all-purpose flour (sifted for extra lightness)
- 2 cups granulated sugar
- 1 tablespoon baking powder
- 1/2 teaspoon salt
- 4 large eggs (room temperature)
- 1 cup whole milk
- 1/2 cup vegetable oil
- 2 teaspoons vanilla extract
- 1/4 cup strawberry puree (from fresh strawberries)
- Optional: 2-3 drops of pink food coloring for a more vibrant hue
For the Strawberry Filling:
- 2 cups fresh strawberries, hulled and sliced
- 1/4 cup granulated sugar
- 1 tablespoon lemon juice
- 1 teaspoon vanilla extract
For the Cream Frosting:
- 16 oz cream cheese, softened
- 1 cup unsalted butter, softened
- 4 cups powdered sugar, sifted
- 2 teaspoons vanilla extract
- Pinch of salt
For Decoration:
- 1 cup fresh strawberries, halved or sliced
- Optional: mint leaves for garnish
- Optional: white chocolate shavings
Substitution Options: For a lighter version, substitute applesauce for oil, use Greek yogurt instead of some cream cheese, or try a Strawberry Cake mix as a time-saving base. For gluten-free needs, replace all-purpose flour with a 1:1 gluten-free baking blend.
Timing
Preparation Time: 45 minutes (includes hulling and slicing strawberries, making puree, and preparing batter)
- Baking Time: 30-35 minutes
- Cooling Time: 1 hour
- Assembly Time: 30 minutes
Total Time: Approximately 3 hours – which is actually 25% faster than traditional layer cakes that require overnight chilling between steps. The efficient process means you can create this showstopper in a single afternoon!
Step-by-Step Instructions
Step 1: Prepare the Strawberry Puree
Wash and hull 1 cup of fresh strawberries. Blend them in a food processor until smooth. Strain through a fine-mesh sieve to remove seeds (optional but recommended for the smoothest texture). Measure out 1/4 cup for the cake batter and set aside. This fresh puree infuses the cake with authentic strawberry flavor that artificial extracts simply can’t match.
Step 2: Prepare the Cake Batter
Preheat your oven to 350°F (175°C). Grease and line three 8-inch round cake pans with parchment paper. In a large bowl, whisk together the flour, sugar, baking powder, and salt until well combined. This thorough mixing ensures even distribution of leavening agents for consistent rise.
Step 3: Mix Wet Ingredients
In a separate bowl, whisk together eggs, milk, oil, vanilla extract, and the strawberry puree until smooth. If using food coloring, add it now. The room temperature eggs and milk are crucial here – they incorporate more air into the batter, resulting in a lighter, fluffier cake texture.
Step 4: Combine and Bake
Gradually add the wet ingredients to the dry ingredients, mixing on low speed just until combined. Overmixing activates gluten, resulting in a tough cake, so stop as soon as no dry streaks remain. Divide the batter evenly among the prepared pans and bake for 30-35 minutes, or until a toothpick inserted comes out clean.
Step 5: Prepare the Strawberry Filling
While the cakes are baking, combine sliced strawberries, sugar, lemon juice, and vanilla in a saucepan. Cook over medium heat for about 5-7 minutes, stirring occasionally, until the strawberries release their juices and the mixture thickens slightly. Remove from heat and let cool completely.
Step 6: Make the Cream Frosting
In a large bowl, beat the softened cream cheese and butter until smooth and fluffy, about 3 minutes. Gradually add the sifted powdered sugar, vanilla extract, and salt, beating on low speed until incorporated, then on medium-high until light and fluffy. The sifting step eliminates lumps for the silkiest frosting texture.
Step 7: Assemble the Cake
- Once the cakes have cooled completely, level the tops if needed using a serrated knife.
- Place the first layer on a cake stand or serving plate. Pipe a dam of frosting around the edge to prevent filling from leaking.
- Spread half of the strawberry filling inside the dam.
- Top with the second cake layer and repeat the process.
- Place the final cake layer on top, bottom side up for a flat surface.
Step 8: Frost and Decorate
Apply a thin crumb coat of frosting to the entire cake and refrigerate for 15 minutes. This crucial step seals in crumbs for a flawless finish. Then, frost the cake with the remaining cream frosting. For a professional look, use a bench scraper held at a 45-degree angle to smooth the sides. Decorate the top with fresh strawberries, mint leaves, and white chocolate shavings if desired.
Nutritional Information
Per serving (1/12 of cake):
- Calories: 580
- Total Fat: 32g (Saturated Fat: 17g)
- Cholesterol: 125mg
- Sodium: 320mg
- Total Carbohydrates: 68g (Dietary Fiber: 1g, Sugars: 52g)
- Protein: 7g
This Strawberry Cream Layer Cake provides approximately 15% of your daily calcium needs and 8% of your daily vitamin C requirements, primarily from the fresh strawberries. While indulgent, using fresh fruit adds nutritional value that store-bought cakes often lack.
Healthier Alternatives for the Recipe
For a lighter version without sacrificing flavor, try these modifications:
- Replace half the all-purpose flour with whole wheat pastry flour for added fiber and nutrients.
- Reduce sugar to 1½ cups in the cake and 3 cups in the frosting – the natural sweetness of strawberries compensates beautifully.
- Use light cream cheese (Neufchâtel) instead of full-fat for a 33% reduction in fat content.
- Substitute Greek yogurt for half the butter in the frosting for added protein and reduced calories.
- For a dairy-free version, use coconut milk instead of whole milk and plant-based butter alternatives in the frosting.
Serving Suggestions
Elevate your Strawberry Cream Layer Cake experience with these serving ideas:
- Pair a slice with a small scoop of vanilla bean ice cream for an indulgent dessert experience.
- Serve alongside a strawberry-basil infused sparkling water for a refreshing contrast.
- For brunch presentations, add a dollop of lemon curd on the side for a tangy complement.
- Create a dessert flight by serving small slices with chocolate-dipped strawberries and champagne.
- For summer gatherings, freeze thin slices for 20 minutes before serving for a semi-frozen treat that beats the heat.
Common Mistakes to Avoid
- Using cold ingredients: Room temperature eggs, milk, butter, and cream cheese incorporate more air, creating a lighter texture. Set them out 1-2 hours before baking.
- Overmixing the batter: This develops gluten, resulting in a tough, dense cake. Mix just until ingredients are combined.
- Opening the oven door too early: This causes temperature fluctuations that lead to sunken cakes. Wait until at least 25 minutes have passed before checking.
- Frosting warm cakes: This melts the frosting and creates a mess. Allow cakes to cool completely (about 1 hour) before assembling.
- Skipping the crumb coat: This thin initial layer of frosting seals in crumbs for a cleaner final appearance. It’s worth the extra 15 minutes of chilling time.
Storing Tips for the Recipe
Proper storage maintains both flavor and texture of your masterpiece:
- Room temperature: The assembled cake can be stored at room temperature for up to 24 hours, covered with a cake dome to prevent drying.
- Refrigeration: Store leftovers in the refrigerator for up to 5 days. Place toothpicks around the top before covering with plastic wrap to prevent the frosting from sticking.
- Freezing: Individual slices freeze beautifully for up to 3 months. Wrap each piece in plastic wrap, then aluminum foil, and place in a freezer bag. Thaw in the refrigerator overnight before serving.
- Make ahead: Cake layers can be baked up to 3 days in advance, wrapped tightly in plastic wrap and stored in the refrigerator. The strawberry filling can be made 2 days ahead and refrigerated.
Conclusion
This delightful Strawberry Cream Layer Cake combines the perfect balance of sweet, tangy, and creamy elements to create a dessert that’s both impressive and approachable. The fresh strawberry components elevate it beyond ordinary cakes, while the step-by-step instructions ensure success even for novice bakers.
Have you tried making this showstopper cake? I’d love to hear about your experience in the comments below! Share your photos, adaptations, or questions – and don’t forget to check out our other seasonal fruit-based desserts for more inspiration. Happy baking!